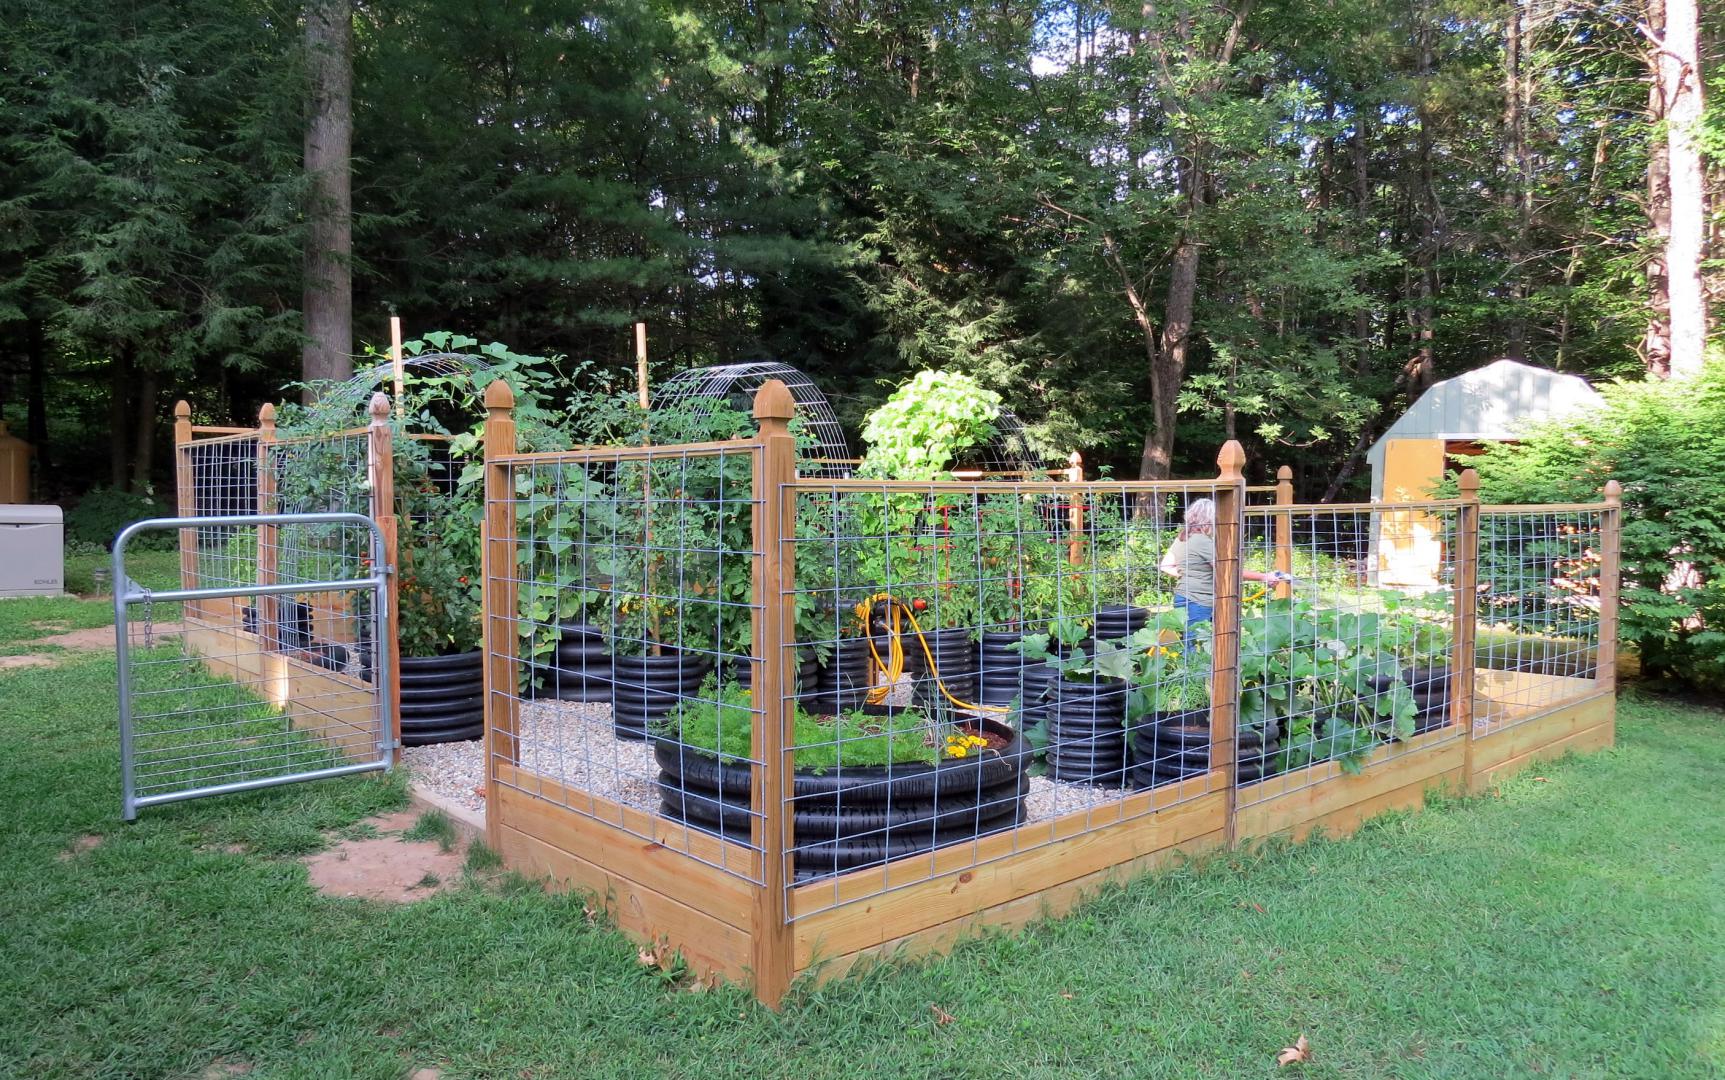
A New Kind of Garden
In the spring of 2020, the first pandemic spring, we put in a new and innovative garden at our house. I have gardened off and on across my lifetime. Kristine and I had a small garden at our old house. For the last couple of years Kristine had a plot at the community garden in the center of town. It was a modest affair and just far enough away to make it annoying to have to go water several times a week. In the fall of 2019, I suggested we give up the community plot and put in a real garden at the new house. I had some ideas that I thought would work and wanted to try.
Raised beds are great and Kristine wanted two foot tall beds to reduce the bending over. Sounded good to me. Most raised beds are formed and held together in a wooden frame. The problem is, wood rots. You can use pressure treated which lasts longer but face the risks associated with all those chemicals. Untreated wood like pine or fir are much safer, but rot quickly. Redwood and cedar hold up better but are pretty pricey. When the wood rots, you can wrap another layer around the old without the bed collapsing. All well and good, but after a few of these renovations your walkways between are going to get narrow. I know you can remove the old boards in winter when the bed is largely frozen and not lose the bed shape. But, with two foot high beds, I wasn’t so sure.
I had a different and better (I hoped) idea. I was going to build round beds made of scrap ADS (Advanced Drainage System) pipes. ADS pipe is used for culverts. You’ve probably seen it, it is a double wall black plastic pipe with a smooth interior for water flow and corrugated outer layer for strength. They come in twenty foot lengths and diameters from a few inches to several feet. They are very expensive… a 24” diameter twenty foot pipe is around $700. But, they are also indestructible and don’t degrade. And here’s the good part… DPW crews are always cutting them down to get the right length for a given road. They generate scrap pieces. When I explained what I was after to my town DPW supervisor he replied with “take all you want, there’s all kinds of scraps behind the building… you will save us having to pay to recycle them”. I ended up with scraps of 12”, 15”, 18”, 24” and 60”. The scraps were typically 3’ to 6’ feet in length. They are easily cut into 2’ lengths with a chain saw. After a few trips to the DPW; I had all the pipe I needed.
I graded a nice sunny, gently sloping, south facing plot with my tractor. I outlined a 25’ by 25’square with orange striping paint. My wife and I had been playing with sketches of circles on graph paper and had a rough idea for the layout of the rings. All the rings were cut to 2’tall. We set all the rings vertically, open top and bottom in the proposed garden. We arranged and rearranged them many times over a several day period until we were satisfied with the design. I highly recommend this because (as with so many things) it looks one way on paper and quite another in 3d and real time. Then we traced around the rings with the orange paint. We had 5 yards of screened loam delivered right next to the garden site. We removed all but the center most rings and set them to the side. Remember that I had already traced all the rings and knew where they had to be put back. Because we had a tractor with a front end loader, we were able to scoop up the loam with the tractor bucket and bring it to the top edge of the rings. We scraped the loam out of the bucket with a hoe into the smaller rings. The big rings were slightly wider than the bucket so I could dump the bucket directly into them.
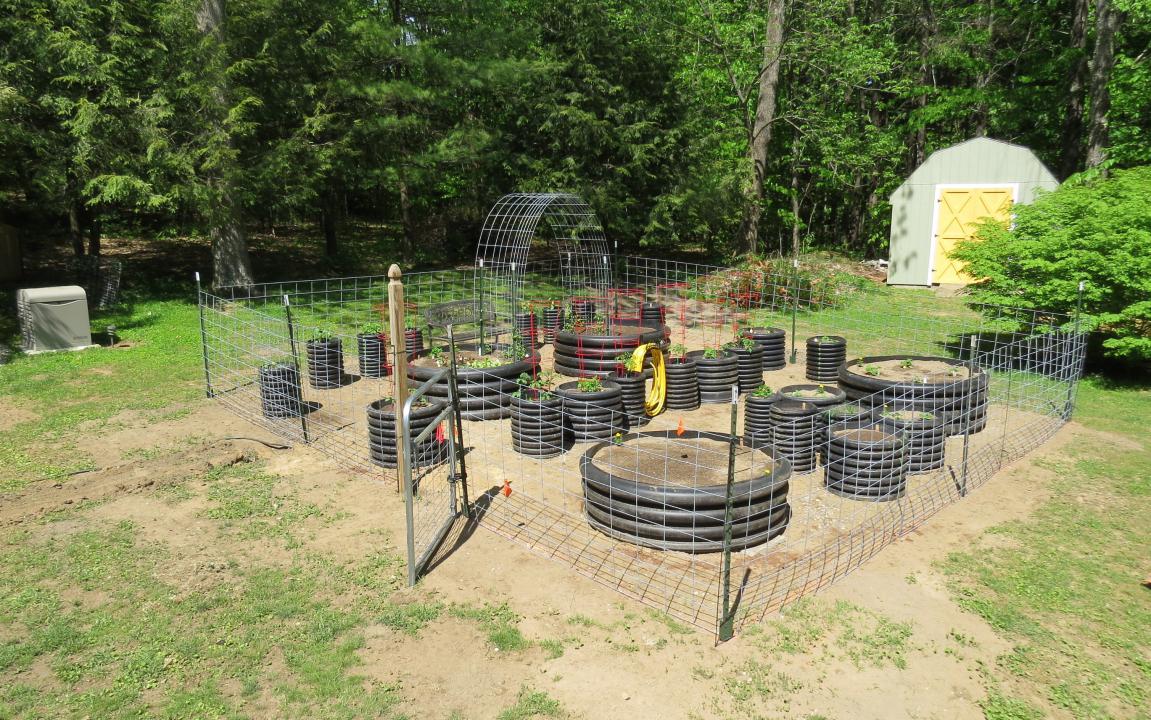
The Rings are Full and Planted with a Temporary Fence
Moving dirt by hand (wheelbarrow and shovel) is hard physical work. This was simply an easier and less labor intensive way to get it done. I might add that my wife wasn’t all too sure about the first Kubota; she thought it was pretty expensive and maybe not really necessary. After we filled the first five or six rings on a hot and humid spring day, she turned to me with a sheepish grin and said “you know, I think I love the tractor!” We also put about 6” of crushed stone in the bottom of the rings for drainage and to discourage borrowing animals like moles. After the center rings were filled we grabbed the rings that sat just outboard of them and set them on their tracings. We filled them next. In other words, we built the garden from the inside out, first the center and then out to the edges so we could use the tractor to fill the rings.
When all the rings were level, full and in place… it was time to start building the fence. Because of the grade, we used a step panel design. We hand dug the post holes and set the posts with two bottom skirting boards which were 2”x10” pressure treated (pt) planks. It’s OK (and wise) to use pt here away from the rings and plants. The skirting boards strengthened and help stabilize the posts and I hoped would help discourage woodchucks from entering. Now, before finishing the fence, I used the tractor again to bring in the crushed stone. I wanted walkways between and around the rings that would be mostly weed free. Woodchips over cardboard is a common strategy but needs replacing every couple of years. Crushed stone (3/4”) over landscape paper works great and never needs to be replaced. It’s more expensive but drains much better, looks great and best of all, ticks don’t like it and they pretty much stay off it. I’m not a big tick fan and you probably aren’t either. So the lower skirting board keeps the 3” of crushed stone in and I was able to dump bucket loads through the unfinished fence between the fence posts. I couldn’t get to the center most parts of the garden so we did have to wheelbarrow some of the stone in.
After the stone was raked out and leveled, I installed the top cross bar (pt 2”x4”) between the posts and stapled the cattle panels to the posts and cross bars. Cattle panels are heavy rigid box wire fence panels available at places like Tractor Supply. I’ve built a lot of fences in my lifetime; I used to have a fence building business on the side. The kind of box wire that comes in a roll is very hard to stretch tight and even if you get it fairly tight it will stretch and sag over time. It looks crappy after it sags and is a huge pain in the ass to tighten. Cattle panels are 50” tall and come in 8’ and 16’ lengths; lay flat and are too stiff to be rolled up. They stay put and never sag. They are not that expensive and easy to install with a pneumatic stapler. I’m a big fan of pneumatic staplers and nailers for repetitive tasks. I would not have enjoyed hammering all those staples. I’m also not a fan of building fence gates (been there, done that). Wood gates will sag and warp over time. Do yourself a favor and go back to Tractor Supply and buy yourself a 4’ galvanized light weight metal gate. They work great, cost around $100, are very light weight and can be lifted off their pintel hinges (no tools) and put away for the winter which will extend their life by many years. And if I may suggest: don’t nail crossbars and skirting boards to the posts. Use screws, this is the structure, the integrity of your fence. Galvanized deck screws work all right, GRK® screws which are deck screws on steroids work really well… more money, but money well spent.
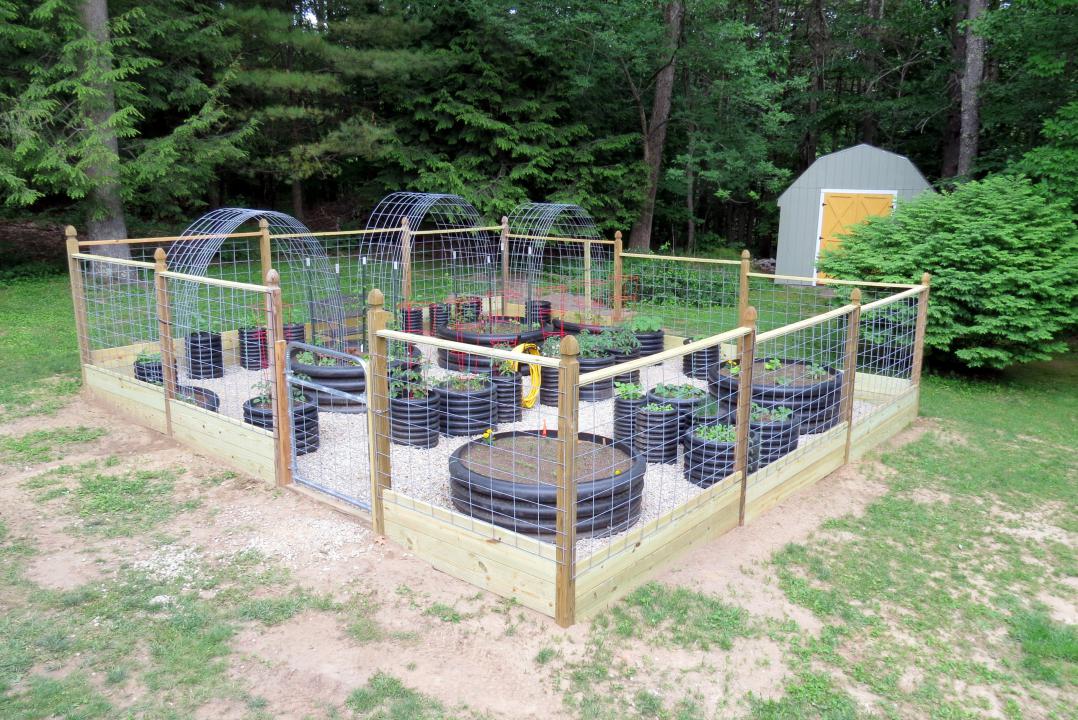
The Fence, Trellises and Crushed Stone are Done
There are a few other features built into our garden design. I’m not a fan of rolling and unrolling hoses day after day. I got a pretty healthy dose of hose rolling over the years as a firefighter. I laid an underground water line right into the center of the garden, where I set a post with a faucet and a hose reel. We have a short hose that reaches all parts of the garden easily. This proved to be an even bigger blessing the first summer that was unusually hot and dry. The black ADS rings heat up pretty good and dry out the soil, there were stretches of warm weather where we had to water every day.
The trellises you see in the pictures also come from Tractor Supply. They are hog panels, similar to cattle panels but 34” wide and 16’ long. You drive a couple of “T” posts on either end and bend the panel to fit between. A few well placed plastic tie wraps are used to secure the panel to the posts. The panels need to be anchored in the rings so the plants have a place to root before climbing the trellis. This gives you additional growing space that is vertical. We have used it for pole beans, cucumbers, peas, etc. Lots of plants climb well and thrive on trellises. I take no credit for the hog panel trellis idea. I saw them on YouTube on a channel called “Roots and Refuge”, a young homesteading couple from Arkansas. This is a channel well worth watching. The wife, Jess, is a very knowledgeable gardener who also knows how to share her ideas. They make very watchable videos that are enjoyable and full of good information. I highly recommend them.
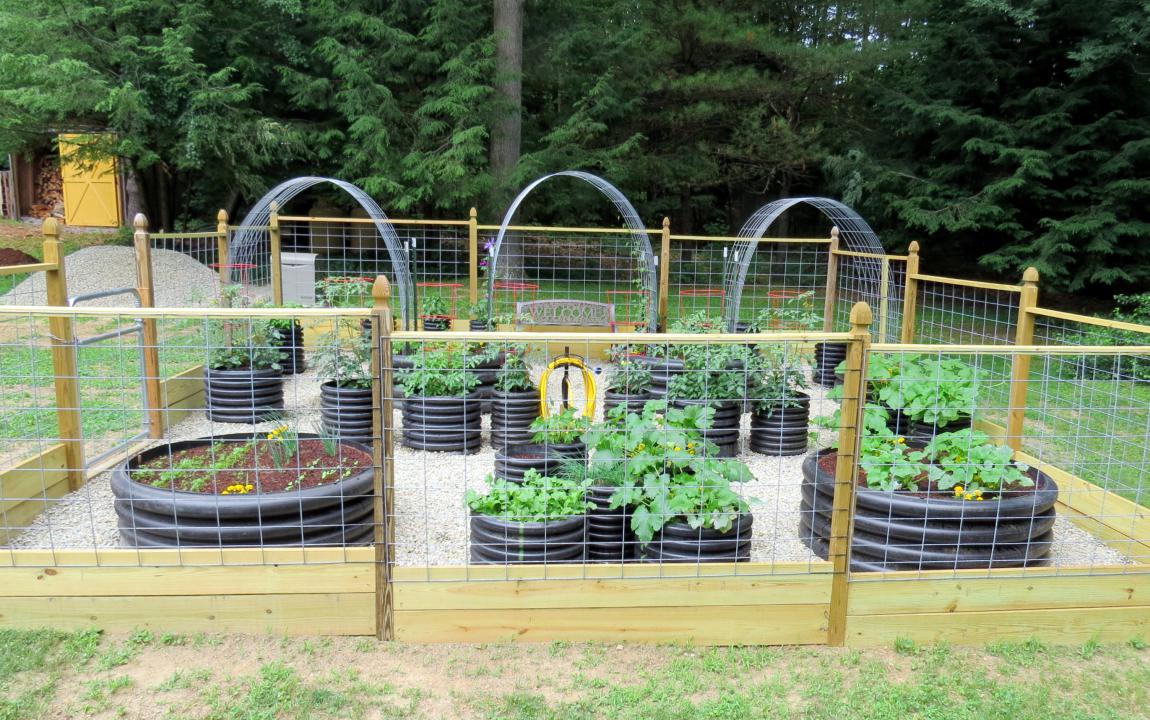
A Month in and Things are Looking Good
Our garden has a bench (it was part of the original design), is a place to sit, relax and enjoy. My wife and I sometimes just sit and chill at the end of the workday and enjoy the fruits of our labor… both literally and figuratively. We often eat what we grow right off the vine like cherry tomatoes; our dog Bobafett likes them as well. We enjoy the serenity and the beauty of the garden. The bench faces in so we can take in the whole garden from our perch. We have had many, many compliments on our garden. We hear things like “my goodness, I don’t think I’ve ever seen a tidier or more organized garden” or as one person put it “this is the most beautiful vegetable garden I’ve ever seen”. Exactly… and that’s just what we hoped to achieve. It is a useful and functional space, but is also beautiful. I do not like tight, cluttered spaces. The interior of our house has lots of open space and so does the garden. Sometimes it’s as much about what there isn’t (read clutter) as what there is. Symmetry, open space and order create a Zen like feel that translates into peace and serenity.
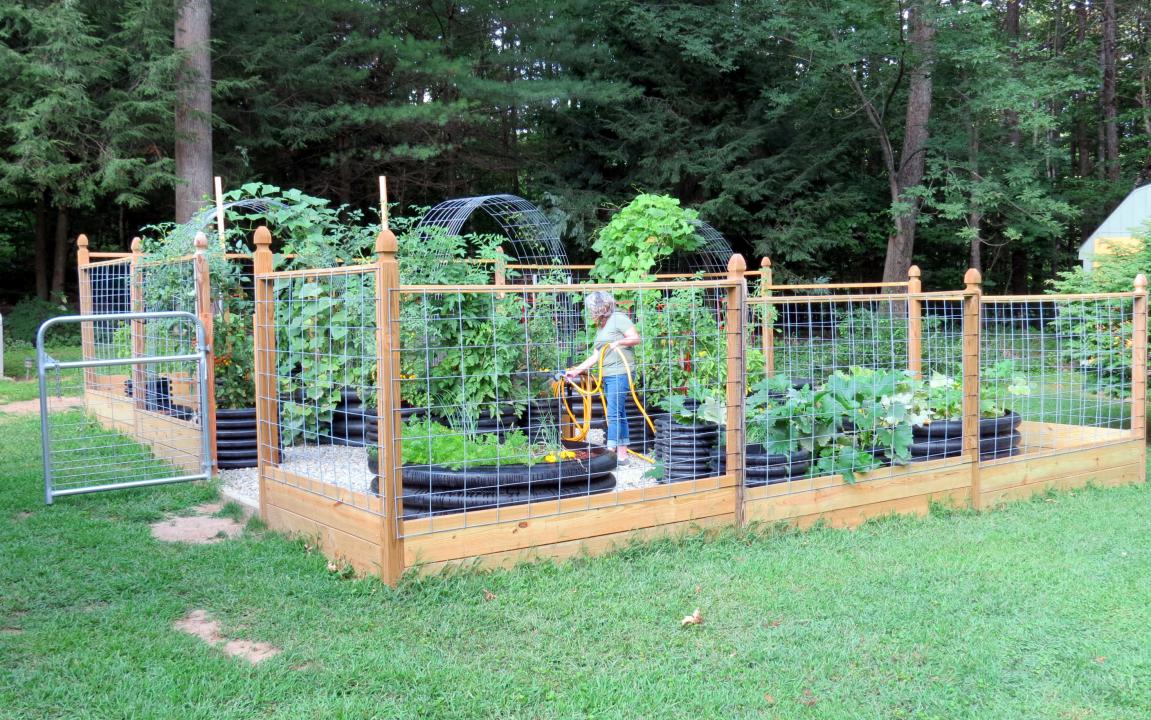
Mid-August and the Garden is Thriving
So the bottom line on a garden like this, especially if you are using a tractor is to think through the order of battle and build it from the center out to the edge. It is not a complicated build, almost anyone can do it. If you don’t have air tools, drive staples with a hammer. I’ve certainly hammered many a staple in my life. If you don’t own or have access to a tractor, it will take longer but you can do it with a wheelbarrow and a shovel. You don’t need a posthole auger on the back of a tractor. They are not as much fun as people think. They get stuck, break and malfunction more than you might think. I’ve used them, but don’t own one. I’ve literally built miles of fence with an old fashioned manual clam shell posthole digger powered by me. Remember, I live in New Hampshire, the “Granite State” where the soil is rocky and the digging is really tough.
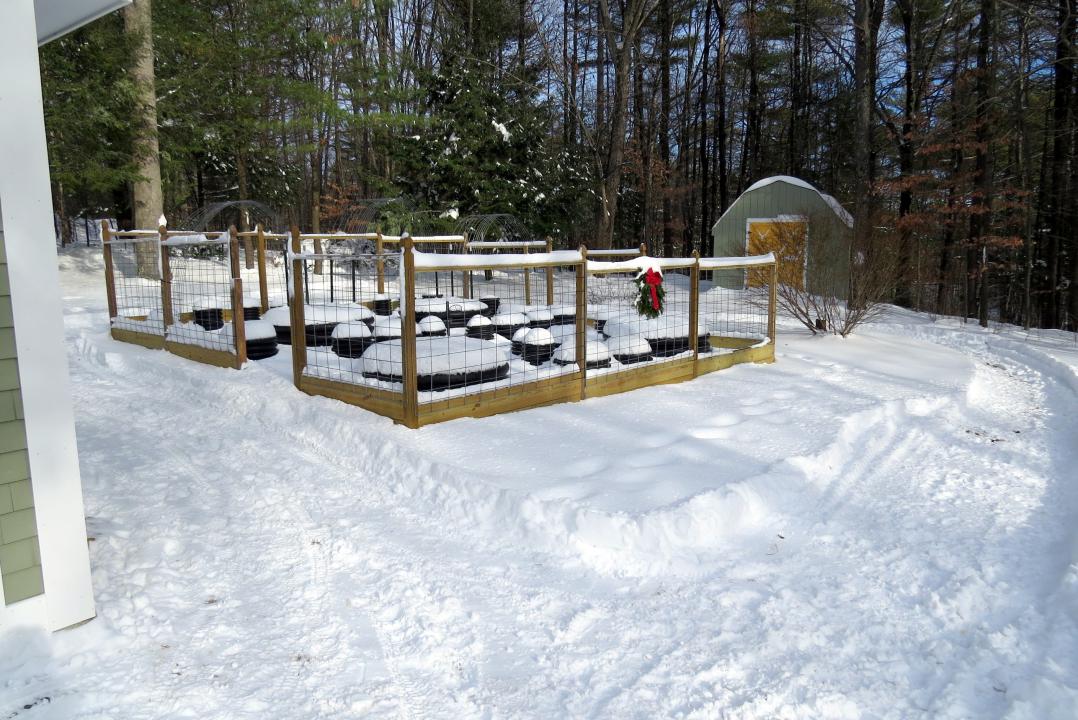
Mid-Winter… the Sleeping Garden

Recent Comments